

Elden Ring Lights On Beach
Welcome to the Elden Ring Walkthrough for Limgrave region! As with other souls games, yous will start out by creating a grapheme, then having the opportunity to go through an intro tutorial before starting into the game proper. Unlike prior games though, Elden Ring is an open-world game, and after the initial surface area you can basically just go off and explore wherever you lot want. There is still an intended story path though, and you should brand sure to catch some things in this showtime area before deciding to blast over to the other side of the map to explore.
The walkthrough volition be cleaved upwardly into 2 sections for each area. The first section will be the intended story path to reach the major bosses and progress the game. The second section will include major points of involvement to bank check out and search for items.
For all other regions refer to Elden Ring Walkthrough.
Limgrave
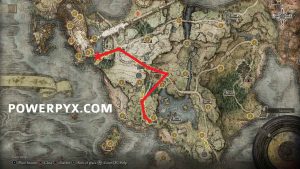
Progression Order:
- Chapel of Apprehension
- Stranded Graveyard
- Cave of Cognition
- The Commencement Step
- Church building of Elleh
- Agheel Lake North
- Gatefront
- Stormhill Shack
- Castleward Tunnel
- Margit, The Brutal Omen
- Roundtable Agree
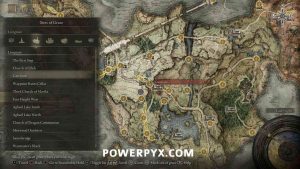
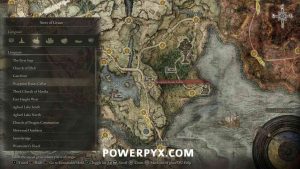
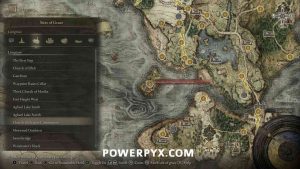
Side Areas:
- Nomadic Merchant (Limgrave Beach)
- Coastal Cave
- Invisible Teardrop Scarab (Limgrave Beach)
- Stormfoot Catacombs
- Groveside Cave
- Stormhill Evergaol
- On tiptop of Stormgate
- Jellyfish Graveyard
- Warmaster's Shack
- Brittle Smithing Stones Statue
- Golden Rune Graveyard
- Soldier Army camp
- Alexander the Iron Fist
- Limgrave Tunnels
- Dragon-Burnt Ruins
- Flying Dragon Agheel
Chapel of Apprehension
After creating your grapheme and watching the intro cutscene, y'all volition be in an area called the "Chapel of Anticipation". This is technically not the tutorial surface area yet, and there isn't anything major to do hear except get out. Interact with the body nearby to obtain the Tarnished's Wizened Finger, which is the item used in this game to exit messages for other players.

You tin can and then interact with the door to leave the building. In that location aren't any other items to find in this expanse, and so to progress merely follow the path downwardly to the courtyard with the statue.

When entering the courtyard a Grafted Scion boss enemy will appear. This is the traditional very hard intro dominate that you lot aren't actually meant to trounce yet.

It's non actually worth trying overly hard to beat information technology here, every bit all you will obtain if you practise is a shield and some swords that you tin can't really use. Once you lot either dice to the dominate or dice immediately subsequently you volition be taken to the actual starting area of the game.
Stranded Graveyard
You will now wake upward in a cave and will have automatically received the Flask of Ruddy Tears and Flask of Cerulean Tears items, Elden Ring's version of the Estus Flasks from the prior games.
Cave of Knowledge
If you have a look downwardly to your right you can see an expanse beneath, with the note on the basis telling you "The Cave of Cognition Lies Below". This is the actual tutorial area, which you aren't required to get through to progress. This area runs you through the basic combat mechanics and some game systems, with you lot having a boss fight at the end confronting the Soldier of Godrick boss.
The aren't whatever items to worry almost grabbing in this area, simply on the ledge at the finish before dropping dorsum into the surface area y'all kickoff in y'all can obtain the "Stength!" emote.

Continue through the door ahead to reach the site of grace for this expanse. On the right yous can see a fog gate with a statue directly beside it. These statues take Stonesword Keys, which are items you tin obtain throughout the game earth and open up these fogs gates, leading to areas with unique items. Don't worry about this i for at present though, fifty-fifty if you picked the keys as your starting item it's not worth trying to go in at that place just all the same, equally the area is full of toxicant.

Interact with the body in the corner to obtain the Finger Severer and Tarnished's Furled Finger items, which are required for co-op. You can then continue upwardly the elevator and outside to the outside world.

The Beginning Step

Caput frontwards and interact with the site of grace just ahead. You are and then introduced to the "Guidance of Grace" mechanic, where some sites of grace on the map will indicate in the direction yous are meant to go for progression towards the main story objectives. You can then speak to the man nearby, who introduces himself as Varré. He talks a bit about topics you likely won't empathise but suggests going to Stormveil Castle, which is the kickoff location you should progress story-wise.

Drop off the side of the platform and interact with the white stake to obtain the Minor Golden Effigy, another item used for co-op. These white effigies can be establish in some locations, and when interacted with actuate the summoning pool for the area. These basically part as suggested locations for looking for co-op partners.

You then want to brand your way to the church building direct to the north. In that location is an enemy walking along the path in your way, a boss chosen Tree Lookout. You lot can try fighting it now if yous really desire, but it's highly recommended you leave him alone and run yourself over to the church building, then come up dorsum and bargain with him afterwards one time you lot get some more than important items.

Church building of Elleh
At the Church building of Elleh, yous can notice your first vendor, every bit well as a Smithing Table that allows y'all to upgrade items.

The main things you want to worry nearly from the vendor would exist the Cracked Pots x3, Crafting Kit, the three Cookbooks, and possibly the Torch. Ownership the Crafting Kit allows yous to craft items, which are made using items you lot learn from the diverse cookbooks. Throwable items are made using Cracked Pots, with you existence able to craft equally many items equally Croaky Pots you currently take, then receiving the pots back later they are used so you can craft more items.
In Elden Band but Armaments can be upgraded, not armor, similar to how Darks Souls iii and Bloodborne function, so you should only worry about the base stats of the armor you obtain. Armaments are upgraded using Smithing Stones for normal weapons (which can upgrade to +25), or Somber Smithing Stones for special weapons (which can upgrade to +10). You can obtain 1x Smithing Stone [1] from the Smithing Table, though that isn't enough to practise annihilation nevertheless every bit y'all need 2x Smithing Stone [1] for the commencement level of upgrade.
Once you lot're finished at the Church building, you can follow the guidance of grace to the north to continue.

There will be a number of Soldiers in the forest expanse y'all can fight if yous wish, or only continue forward.

In front of you there volition be a ruins area with a number of enemies inside. You lot tin head in if y'all want, only it's actually more healful if yous rotate around the right side to reach the site of grace on the far route beginning.

Agheel Lake Due north
Balance at the site of grace and you will exist introduced toMelina, a woman who offers to play the role of maiden for y'all, allowing y'all to increase your level using Runes y'all collect. She as well gives you the Spectral Steed Whistle, which allows you to summon the steed Torrent, allowing yous to traverse The Lands Betwixt much more apace. It would be recommended you assign the Whistle to one of your pouch items slots so that you tin utilize the whistle quickly by holding  and then pressing a directional button.
You should now open up your map and travel back to the Church of Elleh. There will be a mysterious figure sitting on the nearby wall. She introduces herself as Renna, and you should respond her question with "I tin phone call the spectral steed", and she will give you lot the Spirit Calling Bell and Solitary Wolf Ashes.
This allows you to summon NPC helpers from in sure areas to aid you out. You will know yous are in an area you lot tin summon in past the white tombstone icon that will announced in the left department of the screen.

Warp back over to Agheel Lake Northward, and you lot will now be making your way through the "Gatefront Ruins" area to progress. This expanse volition have a number more soldiers wandering effectually, some with shields, some without. If y'all are trying to clear out the whole area you will generally want to keep them separated, only alerting one or two at a time.

Watch out for the guy walking back and forth along the path in the middle, because he has a trumpet and if you alarm him he will alert all other enemies in the expanse, and you tin can end upwards with anybody in the ruins chasing you.
The unique-looking enemy with the spear and large shield is the nearly dangerous in the area. They tin exercise things like perform counter hits against you, so try to hit them after attacks or swing around for backstab. Using the Lone Wolf Ashes you lot should have received just earlier is a great idea for immigration this area out, every bit the Wolves will constantly stagger most of the enemies here.
Once all the enemies are dealt with you tin can work on clearing out the area of loot. Directly in the center of the ruins y'all tin can find a big rock slab with an item in front. These are what the map steles will look like throughout the game. They can be identified by a small orangish colonnade in unforgged map areas, then when picked up make full in the residuum of the map area effectually them with actual detail. Pick upwardly this one to obtain Map: Limgrave, West.
For other important locations in the ruins, you can search the backs of the big blackness carriages for chest, and yous tin can obtain the Flail and Lordsworn's Greatsword weapons.

If you go to the southward corner of the ruins you can discover a stairwell leading down into the basis. Every "ruin" on the map will have a stairwell like this, with a room at the bottom with some loot (though sometimes you demand to go through an enemy first). This one contains the Whetstone Knife particular, which allows you to assign Ashes of War to your weapons at sites of grace, and also provides your commencement i, Tempest Stomp.
One time you're finished searching the ruins, yous tin can become up to the big stone arch to the due west and activate the next site of grace.
Gatefront
To continue, y'all now need to caput through the large gate in front and up the narrow path.

There are a number of soldiers in here, but much worse is the Giant that will jump downwards from above.

You can effort to deal with the enemies in this surface area if you want, riding around on Torrent and swinging at them while you run by. The Giant is pretty slow, so you lot would only run in and striking its legs later on it attacks. If yous want to just avert and run through the area you tin can jump over the barricades in your way, then follow the road. When you spot the golden tree on the correct, make certain you grab the item sitting abreast it.

This will be aGolden Seed, and there will be at least 1 of them beside every one of these golden copse that you see. They tin can be used to upgrade your Flasks, with the seeds increasing the number of uses you have total for the flasks. Once you lot've picked it up, keep up the hill towards the buildings on the right to reach the side by side site of grace.

Stormhill Shack
At the shack, go inside and speak with the woman in red who is sitting on the flooring. Speak to her three times, and y'all will receive the "Sitting Sideways" emote, followed past the Spirit Jellyfish Ashes.
Spring up on the nearby platform to as well obtain a Stonesword Key.

Yous tin can and so proceed following the road upwards towards the castle. There will be more soldiers walking forth the path, that you tin deal with or ignore.

You will too probably see (and hear) a modest bug pushing a ball around. This is a Teardrop Scarab, and you can notice a few varieties of this around the game world which give different things.

Scarlet or Blue ones volition refill your flask charges for the respective type, while White or Gold volition drop unique items for y'all. This White one drops the Wild Strikes Ash of War. Ashes of War are typically what the White ones will drop
Continue upwardly the path and there will be more than soldiers forth the way, along with a large crossbow at the top of the path that volition shoot towards you. You tin fight the soldiers hither if you lot desire, just it would be recommended you make your way up to the tunnel to get behind the crossbow first as if you get hit information technology does a pretty big chunk of damage.
Once you're washed in this area, proceed through the tunnel to the terminal site of grace before the first dominate.

Castleward Tunnel
This is the last site of grace earlier you progress to the first boss, so brand sure to go yourself fix up earlier continuing out of the tunnel. There is as well a summoning pool statue on the left, and an NPC summon sign on the right where you tin summon Sorcerer Rogier.

Margit, The Fell Omen
Advantage: 6000 Runes + Talisman Pouch
Margit is basically the kickoff dominate if you follow the chief path the game shows you on your map (which is actually not recommended to do) as well as your first big test of your agreement of the game.
Margit is extremely ambitious and has a variety of moves and follow-ups with literally no cooldown in between. He can throw lightning daggers at y'all from a altitude, plunge attack for massive impairment, or rush at you with his spear which can likewise atomic number 82 to a combo.
Additionally later on on he as well pulls out a holy lightning hammer which he also uses in plunging attacks, too every bit his grounded ones. What makes the fight difficult is his constant onslaught on you lot but with the usage of some of the game's mechanics, it can exist a bit easier to defeat him.
Summoning Rogier before the fight can help, every bit he will pull Margit'south attention for a flake. You should also make apply of your Ashes of War – you lot tin summon creatures/mobs to aid yous in battle. The combination of both the NPC and Ashes like the Wolf Pack helps a lot since they will both help y'all with attacking the dominate, besides as giving yous an opportunity for attacks since the boss will be busy with them.
There is too a unique detail that y'all can purchase from Patches in Murkwater Cave, which can exist used a few times to temporarily stun Margit during the fight for three – iv seconds, allowing complimentary harm.
The easiest way after some testing was the combination of ranged spells + ashes of war + the NPC for a less stressful battle.
Once Margit is defeated you gain a new site of grace, then can continue frontwards into Stormveil Castle.
Roundtable Hold
The Roundtable Hold is the hub expanse in Elden Ring. You will be prompted to go to information technology by Melina eventually when resting at a site of grace. The trigger seems to be somewhen when resting afterwards having tried to fight Margit at least once, or possibly defeating ane of the other bosses in Limgrave. When you agree to go in that location yous gain access to a number of new NPCs and vendors to speak with, then brand certain to explore around and speak to whoever is there the commencement time you travel there.
Side Areas
If Margit is causing too much trouble or yous merely want to have a look around in Limgrave, in that location are a bunch of locations y'all can trek around to with plenty of items to find and enemies to impale. Most side areas within Limgrave is pretty on the level with where yous are at the start of the game, only be aware that if y'all manage to become yourself outside of the Limgrave area (past the bounds of the revealed Limgrave maps) you tin can notice a lot more dangerous enemies and environments. There are some more unsafe bosses that will announced at dark in Limgrave, so if you're worried about fighting them don't be put off past the idea of just running away or switching the time of twenty-four hour period to morning time/apex at a site of grace.
Locations volition exist listed by and large clockwise around the map starting from The First Stride site of grace, as that'due south where you start out and and then some of the harder locations are on the eastward side of Limgrave.
Nomadic Merchant (Limgrave Embankment)
Make your way down to the embankment to the due west. Underneath the big stone arch, you lot can find a Nomadic Merchant (whatever merchant that isn't specifically named is called a Nomadic Merchant). The most of import item you will want to grab from him is the Armorer's Cookbook [ii], equally this allows you lot to craft Neutralizing Boluses, items used to cure toxicant.

He besides is the easiest place to obtain a bow early game if you didn't happen to start with one of the two classes who have bows by default.
Coastal Cave
Near a grouping of demi-homo enemies on the beach, you can find the entrance to the Coastal Cave. Caput through the cavern and you volition spot some more demi-humans along the path, so before going through the opening into the surface area with the campfire you tin can find a summon sign for Former Knight Istvan.
Head into the expanse with Istvan, and popular some Ashes if you have them (the Lone Wolf Ashes are very helpful).
Demi-Human Chiefs
Reward: 675 Runes, Tailoring Tools, Sewing Needle
You lot will have to face up several Demi-Humans and 2 Demi-Man Chiefs, they are larger demi-humans wielding large daggers and are quite ambitious, so it tin can be difficult to manage this fight at a low level by yourself.
At first, but 1 of them will attack, with the 2nd one joining in after a short time, they will set on in combos consisting of a few, adequately wide arcing hits, roll or motility backward, then move in for ane-ii hits once they do the slam assault, it'due south a good idea to accept care of the minions outset equally they get down in a few hits. If you tin keep up the offensive you can stun them and move in for a critical hit to deal a practiced amount of impairment.
If y'all're using magic the same applies, fill-in/roll out of the fashion of their attacks and so endeavour to clasp in one-2 shots of magic.
After defeating the pair of bosses you will receive the items Tailoring Tools and Sewing Needle, which allows you lot to change the look of some items at sites of grace. You tin and then continue through to the end of the cave (don't interact with the spot on the ground to Return to the Entrance, just continue deeper into the cave until y'all exit over again).
Church of Dragon Communion
Out the other end of the cave, you arrive on an island off the westward embankment of Limgrave. Caput up on to the loma to find the Church building of Dragon Communion. If you collaborate with the rock pillar with the red flame coming out y'all will be able to trade Dragon Hearts for some unique Sorceries later on when yous obtain Dragon Hearts from killing Dragons.

Head to the southward side of the island, and you tin can observe a Teardrop Scarab that drops a Somber Smithing Stone [1] when killed.

Invisible Teardrop Scarab (Limgrave Beach)
At the due north end of the embankment you tin can run into a bunch of bright spots moving effectually quickly in a loop. This is an invisible Teardrop Scarab going in circles. Your all-time bet to hitting it is to just stand along its path, then swing when it comes effectually near you. When y'all successfully kill it you lot obtain the Stamp (Sweep) Ash of War.
Stormfoot Catacombs
Northwest from the Church of Elleh, you tin can find a door in a wall that leads to the Stormfoot Catacombs. This will probably be one of the start "Catacombs" areas you lot detect, which are dungeons that have unique items and a boss at the finish. In this location, you can find the unique items Prattling Pate "Hello", Wandering Noble Ashes, and Noble Sorcerer Ashes from the dominate at the end. It too contains some Grave Glovewort and Ghost Glovewart, which are items you volition exist able to use afterward to upgrade Ashes.
Erdtree Burial Watchdog
Advantage: Noble Sorcerer Ashes + 1200 Runes
While it is standing it can merely attack with a very quick overhead strike – you can try dodging it by timing your roll but the move has insane tracking and might hitting you lot anyway. It is simply better to just dorsum away and have it whiff the attack.
While crouching the variety of its moves is much bigger. It can use a flamethrower assail of medium range which tracks your management, so running around it might still get you lot burnt. It can leap into the air for a plunge set on or a series of multiple plunge attacks (up to iii) – in this example just keep going backwards and it won't reach y'all. The dominate also has a variety of sword attacks while crouching which have weird dodge timings.
Your best method for an piece of cake win would exist punishing his plunge attack series since it leaves the boss vulnerable for some fourth dimension one time the attack is done.
Groveside Cave
Directly n of the Church building of Elleh, you will be able to find a cave in the wall backside a soldier at a burn. Inside you can discover a number of wolves sleeping around the get-go expanse. On the lower level basically right underneath where you enter you lot can pick up a Cracked Pot from a body.
Continue deeper into the cave and you will reach a gilt fog wall, which you tin enter for a boss fight.
Beastman of Farum Azula
Reward: 700 Runes, Flamedrake Talisman (Talisman)
This dominate is a one-half-human one-half-wolf hybrid and is a pushover at best, he volition approach you and set on with basic 2-3 hit combos with his blade-similar weapon, he will sometimes do a howling assail and a weapon slam assault.
You can easily cake or dodge all of his attacks and hit him with magic or melee combos to quickly defeat him, a very easy boss.
Stormhill Evergaol
At the border of the cliff on Stormhill, yous can find a large round stone basin with a lit-upwards area in the middle. These locations are called Evergaols, and are basically boss areas that you tin discover in the environment. When you interact with the circle in the center of the basin you are transported to a different-looking version of this expanse, with the dominate now spawned. These bosses are normally a flake higher level than the surface area their Evergaol is establish in, so you may desire to leave this one for later.
Crucible Knight
Reward: 1800 Runes, Aspects of the Crucible: Tail (Incantation)
This boss is a tall knight clad in armor wielding a sword. To commencement off with his mainly uses medium speed combos of one-2 hits, a forward thrusting assail which tin can be dodged by rolling backwards or to the side, an a horizontal slash in front of him, an upward shield bash, an upwardly sword slash, and a stomp his sword with an AOE effect followed up by a 2 handed slash. He is particularly vulnerable after this set on for a few hits. Otherwise, you need to block or roll out of the way and hit him once or twice during the openings from his attacks, he is quite aggressive, so you need to time this carefully.
If y'all're using magic, go on to a medium distance, if you spam at him too much he volition bring his shield up and block almost all of it, instead you should bait his attacks and move out of the manner and fire magic at him.
When he gets to half health he will enter the 2d phase, he will use two new attacks, one where he grows wings at flies at you with a slash which tin can be dodged or blocked rather easily, sometimes he follows this up with a double tail swing attack which has a very long range and wide arc if you lot're too close to him, and also has a tail swipe attack that has less range than the previously mentioned, the strategy remains the aforementioned, just be wary of the tail swipes.
On meridian of Stormgate
Only beside the Evergaol, you tin can head over to the upper part of the Stormgate, where there is a door in the side leading to the expanse above the gate itself. At that place is the i tougher enemy who walks in and out of the doorway, then two more than soldiers on the platform. One time they are dealt with you can grab a chest from the platform which contains the Arrow'south Reach Talisman.

Jellyfish Graveyard
Head to the northwest corner of Stormhill to the wooded area on the map and you can find a number of Jellyfish spirits floating effectually a graveyard area. There are two distinct graveyard sections, one farther west than the other. In the westward department of the graveyard, you can find a Smithing Rock [one], and in the east section of the graveyard, you lot can find the Godrick Soldier Ashes.

Warmaster'southward Shack
To the east of Stormhill Shack down the road, you tin can find the Warmaster'due south Shack, inside of which you can find Bernahl. This NPC will teach you some Ashes of War, for a price.
Breakable Smithing Stones Statue
Only s of the Warmaster's Shack, at that place is a large area with a number of Giants walking effectually. Directly in the middle of this area is a large statue, which if viewed from the front yous can come across cracks in with lite coming out. If you see these statues, they tin can be destroyed by Giants to allow y'all to grab a number of Smithing Stones from inside.

Bait the Giants in the area to stomp around near the statue to open it, then sneak in and option up the detail in the middle to receive Smithing Stone [ane] x 5 and Smithing Stone [2] x one.
Gilded Rune Graveyard
Simply to the south in betwixt Stormhill Shack and Warmaster's Shack, you can find an area with a number of stone coffins. On acme of the coffins, you should spot a number of items, which are a bunch of Golden Runes, which you can consume from your inventory to exist awarded different numbers of runes depending on the level of Golden Rune. These seem to respawn at these graveyards, then if y'all come by hither once more later you can check back for more runes to pick up.
Soldier Campsite
Downward the route from the Warmaster'southward Shack, you can find a Soldier Campsite across the road. There are a number of weak foot soldiers and dogs in this area, then one heavily armored enemy. You lot can endeavour picking off the weak enemies one by one, then work on the large guy, or just go for the lazy way and ride around in the middle of camp with Torrent and take swipes at everyone as you go near them. One time the enemies are dealt with (or if you manage to sneak in) you lot tin can obtain the Beast Crest Heater Shield from a chest by the stone structure.

Alexander the Atomic number 26 Fist
Farther down the road from the Warmaster'due south Shack, you will reach the edge of the uncovered West Limgrave map. Climb the cliff to the southward where y'all should hear someone calling to you. There will exist a strange pot stuck in the ground, which is the grapheme Alexander. He asks yous to assistance him out, to which you lot should smack him from behind multiple times to get him out of the ground. Once you successfully extract him from the hole, you'll receive the emote "Triumphant Delight" and some Exalted Mankind. If you lot speak to him more he'll let you know he's going to Redmane Castle in Caelid, though that'due south an area yous won't desire to become to until quite a while later.
Encarmine Finger Nerijus
Head north into the ravine along the shallow river, and y'all volition reach a bespeak where an NPC invader spawns further up. If you don't feel like fighting them, yous can run into the cave (next section) or fight them for a unique weapon. If you lot are early game (haven't progressed into Liurnia of the Lakes yet) then a friendly NPC volition spawn and help out. Nerijus uses two daggers that inflict bleed and also some claret magic. Be careful while guarding considering of this, because bleed volition buildup even if you lot have a 100 Physical negation shield. Yous tin can try to keep them at range, or go far pokes after they attack. They tin can heal themselves one time, then when they get low enough will sometimes reattempt to, allowing free damage. Defeating them awards you 1 x Furlcalling Finger Remedy and the unique dagger Reduvia.
Murkwater Cave
In the ravine at nearly the same location that Bloody Finger Nerijus volition spawn yous can also notice a cave in the west wall. Head within, then you will find some Bandits deeper into the cavern. There is a line of bells around the tall grass, so you volition likely alarm them going in. Bargain with them, then y'all tin can become down the left path for a chest with some Mushrooms, then head down the right path for a boss fight.
Patches

Search the breast in the room to trigger the fight. Patches volition so jump down from above and offset attacking you lot. He isn't very tough, only having a spear and shield. He will sometimes spit powder at you, which y'all tin can just move away from. When he reaches about half wellness he will stop fighting, rewarding you with 1 ten Golden Rune [ane] and the emote "Gravel for Mercy".
Speak to him and you tin choose to forgive him. He and so tells y'all he'll be available as a vendor later. Yous can just warp somewhere else and then come back to the cavern and he will exist sitting in the room waiting (you have to go through the bandits in the prior room again). The about interesting detail he has is Margit's Shackle, a unique particular that can be used in the Margit, the Brutal Omen boss fight to temporarily stagger Margit, allowing some extra harm.
There is also now a breast in the room which you tin enquire Patches about, and he'll give some nonsense near it being cloak-and-dagger treasure and whatnot. If you open up information technology though it is trapped, and will warp you to a location over in Limgrave Woods past a large behave.
Limgrave Tunnels
At the north end of the shallow lake, you can discover the entrance to the Limgrave Tunnels. These are mine, where you tin can find some smithing materials (and some enemies mining them). Mines like this role like dungeons, so this does have a boss at the end, which you can reach by jumping off onto a platform halfway down the second lift shaft.
Stonedigger Troll
Advantage: 1800 Runes + Roar Medallion (Talisman)
The Stonedigger Troll is your typical behemothic Souls-like game boss. It's big and wields a mace. Information technology'due south a pretty straightforward fight – when yous go close he will try to stomp you and when you are a fleck further away it volition swing its mace at you.
The only other motility it volition normally do is a charged mace attack which leaves you enough time to go abroad from it. Every bit a melee fighter you should suggest staying close to his feet and avoiding the stomps for an opening. As a ranged caster, the whole fight is extremely straightforward since you lot tin merely shoot it from far abroad and at that place isn't much it tin do as long as you lot avoid information technology getting closer to you.
Dragon-Burnt Ruins
These are a set up of ruins in the center of the shallow lake. At that place isn't actually much here aside from a number of weak nobles muttering about something nearby. You can grab a Stonesword Key off a body in the middle tower of the ruins.

You tin become downwardly into the surreptitious surface area where there is a number of rats you tin fight, only you shouldn't open the chest at the end.

Some chests similar the one hither are really transporter traps, and will ship you somewhere else if you open them and don't immediately go out of the manner.
Once yous are done investigating the ruins y'all can have a trek slightly north to where the nobles are standing around a burning stake pile.

If you hadn't triggered it already, you lot get the fun surprise of Flying Dragon Agheel.
Flying Dragon Agheel
Reward: 5000 Runes, 1x Dragon Eye
It is strongly suggested that you fight this dominate on horseback. If y'all are using a melee character you will demand to wait until it lands and so attack its legs and wings for a few hits at a time, it'south unwise to go for the caput as it will attack with a few bites. If it starts to current of air up to exhale burn get out of the way immediately as the fire can impale yous in one striking if you lot don't have fire protection armor and are lower level.
This is an easy fight if yous're using magic, aim for the head whenever there is an opening with a few spells, especially when it lands every bit y'all tin still be out of melee range and assault from a altitude. If you inflict enough damage to its head quickly information technology volition enter a stunned state, you can then strike a critical hit on its center for good damage.
You lot mainly demand to exist wary of its fire-animate attacks, they embrace a wide arc and you can see clearly when the dragon is winding up to perform ane, dash away on your equus caballus immediately to avoid it. When it lands it tends to breathe fire in a wide arc in forepart of information technology, you can back up or move far plenty to the left or right to avert it and fire some magic, if it flies up above movement every bit far abroad equally you can every bit it breathes fire in a long straight line. It will also sometimes hover above so strike the basis with its claws, this tin also deal heavy damage so go along moving to avoid it
Limgrave Sites of Grace & Named Location
The Showtime Stride

Church of Elleh

Gatefront
Waypoint Ruins Cellar
Artist's Shack

Third Church building of Marika

Fort Haight West

Agheel Lake South

Agheel Lake North

Church of Dragon Communion (reached by going through Littoral Cave)
Seaside Ruins

Mistwood Outskirts

Murkwater Declension

Saintsbridge (may prove under Stormhill region afterwards patch one.02)

Warmaster'southward Shack (may show under Stormhill region after patch i.02)

Summonwater Village Outskirts

Stormfoot Catacombs

Murkwater Catacombs

Groveside Cavern

Coastal Cavern

Murkwater Cave

Highroad Cave

Limgrave Tunnels

Stormhill Evergaol (Named Location)

Stormgate (Named Location)

Gatefront Ruins (Named Location)

Dragon-Burnt Ruins (Named Location)

Waypoint Ruins (Named Location)

Mistwood Ruins (Named Location)

Siofra River Well (Named Location)

Fort Haight (Named Location)

Forlorn Hound Evergaol (Named Location)

Summonwater Village (Named Location)

Cave of Noesis

Stranded Graveyard

Fingeefolk Hero's Grave (Named Location)

Stormhill Shack

Castleward Tunnel

Margit, the Cruel Omen

Warmaster'due south Shack

Saintsbridge

Deathtouched Catacombs

Limgrave Tower Bridge

Divine Tower of Limgrave

Continue with the side by side Region: Stromveil Castle
For all other regions refer to Elden Ring Walkthrough.

Elden Ring Lights On Beach,
Source: https://www.powerpyx.com/elden-ring-limgrave-walkthrough/
Posted by: howardaffins.blogspot.com
0 Response to "Elden Ring Lights On Beach"
Post a Comment